We never compromise on the remarkable quality of our ingredients.

It is said that weddings are a celebration of the senses and few would disagree that sensory pleasure equals chocolate.

Finest quality ingredients include ladels of gourmet chocolate

Bespoke wedding, special occasion and kitchen cake creations

Exceptional styling results in an irresistible image that looks good enough to eat.

Thursday 29 March 2018


I wanted to try something different this Easter and came accross this lovely light, fruity, very much like a panettone Easter bread that is traditional in the Orthodox Christian faith and is eaten in countries like Russia served with Paskha ( a sweet cheese concoction) and or unsalted butter according to Wikipedia.

Kulich is usually prepared a few days before Easter and keeps very well. I would think that is the case as is with so many other fruit style cakes. The beautifully decorated bread (glazed, sprinkled with glacé fruits and sometimes even adorned with fresh flowers) is packed in a basket and taken to the parish priest to be blessed before Good Friday. Each piece of bread is believed to be filled with only happiness for the coming year. If you are a plain Jane - leave the bread rustic as is. There is a lot of beauty in a naked sweet bread with the wrapping still loosely tied.

My inspiration came from Linda Collister’s The Baking Book and after reading the recipe, thought to mention that you definitely have to start prepping a day ahead, at least. Also remember the rising times are long which will make the Kulich making and baking giving you pleasure for most of a day.

This recipe is enough for one 18cm loaf of extraordinary height.

I followed Linda’s advice to use a deep 18cm cake tin and extended the height by using corrugated cardboard. A double folded foil wrap may also be very useful. You will need to extend the height by at least 10-15cm. Secure whatever wrap with string and line the inside of the tin with 2 strips of baking paper cut to size. Also line the bottom of the cake tin with baking paper.


Pre-prep fruit and other inclusions at least a day before
100g sultanas
30ml best quality fragrant rum (The Ströh rum in our house is mine to indulge in baking and/or non-baking times)
100g slivered almonds
75g mixed cut citrus peel

1. Place sultanas in a suitable container with a fitted lid. Drizzle with rum, close the lid and shake every now and then.
2. Roast the almonds for 5-8 minutes on 180 C.
3. Have the rest ready for action the next day.

As well as infuse the milk with Saffron a day before
250ml milk
a large pinch of Saffron stamens

1. Heat the milk to boiling point, stir in saffron stamens, cover. Re-heat the next day to lukewarm to make a  nice cosy start up mix for the yeast.

Morning of Day 2
30g fresh yeast
Saffron milk, lukewarm
5ml castor sugar

1. Crumble the fresh yeast into the lukewarm milk. Stir to dissolve.
2. Make the yeast extra sporty by adding a little castor sugar for boosting energy.

Mixing the dough
150g butter, at room temperature
125g icing sugar
10ml vanilla essence
2,5ml salt
6 egg yolks
500g cake flour, sifted once

1. Using your electric mixer, cream the butter. Add the icing sugar and beat well till very light and fluffy.
2. Add the vanilla essence and salt. Beat well.
3. Add the yolks one at a time, beating very well after each addition.
4. Remove the bowl and add the sifted flour. Cut in with a knife.
5. When almost all of the flour has been worked in, add the happy yeast family. Mix further by well greased hands or with the knife. Keep going till it forms into a soft elastic dough.
6. Grease a bowl with a lid well and lay Your Preciousness softly down. Cover and let her rise for about 1-2 hrs, depending on the room temperature, until she has at least doubled in size.

About lunch time Day 2
7. Knock her down, ever so gently, and again with well buttered hands, work in the prepared inclusions.
8. Lay her down for the last time, snuggle in her prepared tin and let her rise gently until you feel she can not possible stretch her belly any longer. This could take an hour or 2 hours. Like I said - it is a long slow process which gives you pleasure for two days at least.


Madame just layed to rest


Madame with stretched out Boepie
Late afternoon Day 2

9. Pre-heat the oven to 200 C. Bake Princess Kulich for 20 minutes or until she starts to blush a light brown colour, then turn the heat down to 180 C and bake for a further 45-55 minutes.
10. If our dear lady starts to turn too brown, cover her up with foil. Make sure a skewer inserted in the centre comes out clean and dry before you release her forever from her beloved Lofra.

Variations on flavour
Substitute saffron stamens with 10ml ground cardamom.

Variations on yeast
I love using fresh yeast from my local supermarket, but your local supermarket might not be as friendly as mine. Substitute with 1 packet (10g) instant yeast stirred into the lukewarm milk.

Making her pretty
1 cup icing sugar
15ml fresh lemon juice
1 drop of almond essence
15ml warm water

1. While Madame is having fun in the oven, prepare the icing. In a small bowl, mix together the icing sugar, lemon juice, almond essence and enough water to make a smooth, somewhat runny glaze.
2. Allow Madame to cool slightly before revealing her rustic beauty. While still slightly warm, drizzle the glaze over the top.
3. Decorate with sprinkles, flowers, all you like before wrapping her up to be blessed.

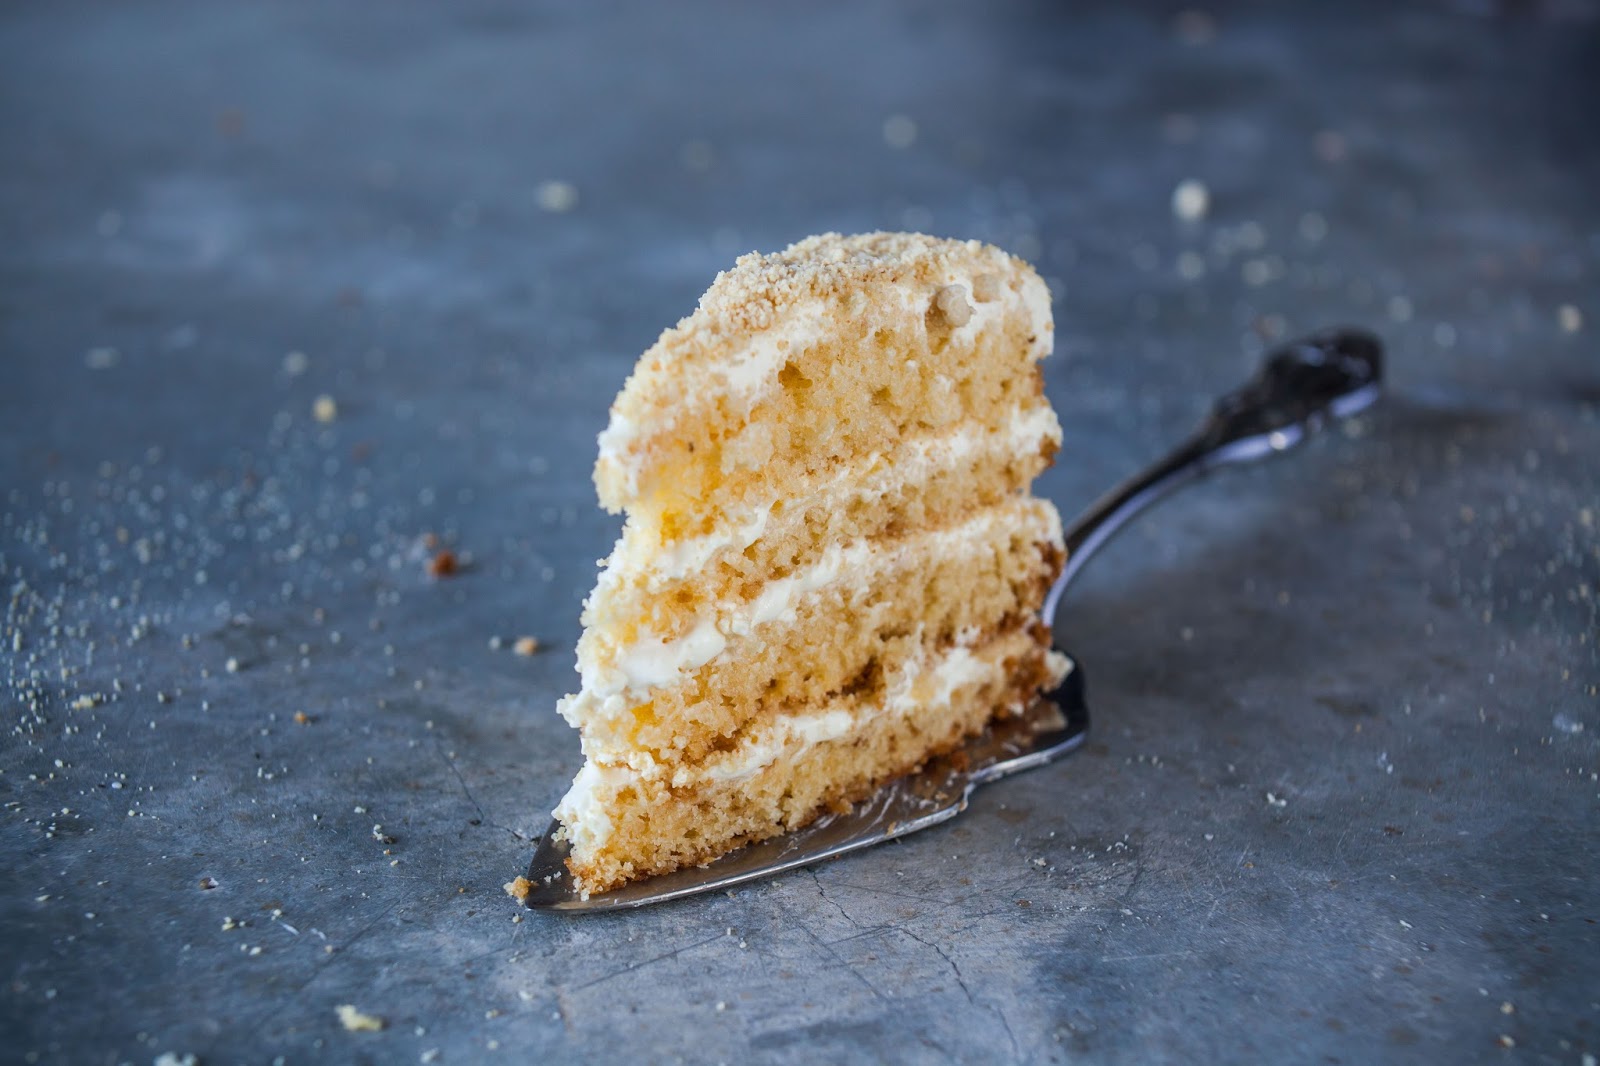
Blessed or not blessed, This Panettone style, sweet, delicately flavoured, fruity, yeasty bread is pure heaven and filled with happiness. Best is to serve horizontal slices, keeping the top as a lid to keep the bread fresh and moist for longer.


Recipe: Kanya Hunt
With Inspiration from Linda Collister’s The Baking Book
Always baked in my beloved Lofra available from Electrical industries


Tuesday 20 February 2018


Our organically styled chocolate creations travel so well, especially our signature tower cake. Hard to believe you would say but true. All or most of our chocolate creations are transported in modular units. When the design is such as the tower cake or large organic pieces of chocolate, mistakes and mishaps can be hidden very successfully and simply blends into the design. Setting up the cake on the other side is also not that difficult. Perhaps it is easy for me to say but once gone through the motions you would easy do it again.

Here follows the very special story in pictures (some pics instant and some professionally taken by Thunder and Love photography of our 4 tiered white chocolate tower that was given as a wedding gift by Patricia Rabie to Dean and Monique Smorenburg:


The cake has arrived safely and will sleep cold until it is time to dance.


It's time...Breath in breath out...


Patricia possibly not breathing at all right now

A silent pause just before launching the top tier


Patricia possibly still not breathing...

There it goes down - easy peasy

Patricia has now been initiated as cake set-upper for the next Smorenburg wedding. She and the wedding cake have passed the grande test. Both are still standing.

A very proud and relieved cake travel and set-up team.

I LOVE this end pic. So Babette's Feast like.
Patricia's report back email read:"Die koek was n ABSOLUTE wenner en toe ons 1 uur huis toe gaan, was daar bitter min van die onderste laag oor!! en glad nie genoeg oor vir ontbyt nie!!!

Baie baie spesiaal, dankie!!!!!

liefde
pxxxx

Patricia Rabie


And here follows the professional pics telling the cake love story as best I have seen.


When we receive thank you emails from our couples such as Monique's, we know we can continue baking and designing wedding cakes for a long long time...


 "Hi ladies,

Just thought to share some pics of the phenomenal wedding cake we had at our wedding!
We are still overwhelmed by how delicious and beautiful it was. The cake was devoured on the night. Hardly a scrap left over the next day. So many people have raved about how absolutely amazing it was.

Thanks again Kanya for making this beauty and Patricia, for your generosity

Kind regards,
Monique Smorenburg


Wednesday 14 February 2018


I know this might not sound normal but I do LOVE my fig tree. It loves me back with an abundance of green figs followed by the sweetest, syrupy ripe figs from mid January until the last pickings on Valentine's day every year. The last 3 years I have had to watch as it endures the drought and still spoils me with fig gifts even though it looses almost all its leafs in the process. It is Valentine's day today and I have picked my last figs. Just enough for one batch of jam which I'll spoil my proper Valentine with later...with some freshly baked farm stall bread and butter

1kg ripe fruit, washed carefully, not dried
750g sugar (I prefer castor sugar)
25ml lemon juice

1. Cut or break the softly sun-ripened fruit in rough quarters.
2. Add the sugar and lemon juice and stir to combine. You can also layer the fruit and sugar and let it stand , covered, overnight.
3. Heat slowly and stir  to dissolve all the sugar before the jam starts boiling. Boil the jam at a steady speed, not too slowly, to ensure a light golden colour. Stir just enough to prevent the jam from burning.
4. Test for readiness:
  • Spoon a little jam onto a chilled plate. The jam should set.
  • Chill some jam in a spoon. It should drop off in a thickish mass rather than run off the spoon.
5. Bottle the jam as hot as you can handle  in sterilized glass jars. Best to fill the jars to no less than 8mm from the top and seal when still hot.

How to sterilize jam jars easily:
1. Wash and rinse jars and lids well.
2. Place them, all wet, on a baking tray in the oven set to 100 °C and heat for 15 minutes.
3. Use the jars as hot as you can handle. Remove all excess water before bottling.

How to get sun-ripened figs without the birds feasting too much you would wonder?
My secret: Organza bags...I wrap each budding fig in organza. I buy them in bulk from Super floral  and the bags are ever so easy to manage. The birds do get clever at the end of the season, but I still have a good crop each time. Besides, my fig tree loves being dressed up in fancy pink.


Chirtsmas in The Hunt House Kitchen is usually a very busy time with last wedding cake deadlines almost dimming our Christmas spirit. This year seems to be different and I have time to indulge in some Christmas baking. I love fruit cake, any, dark and rich and light and especially marzipanny.

Christmas Stollen with homemade marzipan and jugs full of rum and butter is the ultimate joy. This recipe yields 4 large ones or 8 smaller ones: 4 as gifts and 4 for my own indulgence. The Stollens need at least 4 weeks to mature but in my kitchen the first stollen gets munched away as soon as it is cold enough to cut. We call it the TEST STOLLEN. After this year's TEST STOLLEN I had to bake another batch as it was soooooo gooooood, so now family and friends, there will be about 8 very happy friends and 8 for my own consumption. I am sharing aren't I?

For the best Stollen your fruit mix needs to be proper drunk. I use a very good rum, my best is Stroh for that rum and raisin taste. The cherries are actually optional and can be left out without substituting. Start a day or two ahead. I make my marzipan at the same time too. This time I'll be using a very  simple marzipan recipe which uses whole egg.

Drunk spicy fruit mix
600g Dried fruit mix with raisins, sultanas and currants
250g mixed citrus peel
250g red glacé cherries, chopped
125ml rum
Grated rind of 2 lemons
1/2tsp each ground cardamom, cinnamon and mixed spice
Or recipe 1/2tsp each cardamom and nutmeg only

1. Mix it all together in an airtight container and leave to mature and part for 2 days.

Marzipan
Yields 700g
200g ground almonds
400g icing sugar
1 whole egg beaten
15ml brandy or more
a few drops of almond essence to taste

1. Grind the already ground almost extra fine in a food grinder for a smooth marzipan.
2. In a food processor, combine the almond flour and the icing sugar and process for a few seconds.
3. Add the whole egg and just enough brandy and essence to taste to process the mix into a paste that is firm enough to be rolled out or moulded.
4. Divide into 8 equal parts of about 75g each. Cover and refrigerate until required.

The rich, yeasty, buttery  Stollen dough
Makes 6-8 small Stollens, 4 medium, 2 large or one huge Stollen
I always use fresh yeast bought from my local bakery. It really does make a difference. It is an ultra rich dough and requires quite a bit of yeast. I very seldom will us an electric mixer as I find this too straining on the mixer and above all, the process of kneeing and working your dough really gets you into the Christmas or any other spiritual place you can transfer yourself to. I usually spend some time with my Gran up in heaven...we always talk about the time when her mom in law made her knee the bread dough whilst she was highly pregnant with twins.
100g fresh yeast
200ml lukewarm milk
15ml castor sugar
1kg cake flour
200g castor sugar
15g salt
400g butter, soft but not melted
200g eggs, 4 large
extra flour for dusting and rolling
Another 300g butter and a good 1/2cup of rum for brushing
extra icing sugar for final dusting


1. Liven up the yeast by mixing with the lukewarm milk and sugar. Cover and stand to sponge for 15 minutes.
2. Sift together the flour, castor sugar and salt. Reserve a handful of flour mix to be sprinkled over prepared fruit. Make a well in the centre to pour the happy, lively yeast mix into. Stir some of the flour into the mix to create a proper starting dough the consistency of a thick batter and allow to sponge for another 15 minutes.
3. Add the butter and start to incorporate all of the flour into a soft, glossy dough that is not too sticky and holds its shape. The eggs are added gradually as you go. If the dough is too dry add more milk and if too sticky, add more flour. The kneeing/mediation process should take no less than 10 minutes, close your eyes and have fun.
4. Shape the dough on a floured surface into  a large rectangle of about 2,5cm thick. Spread the whole surface with the fruit mix and roll up as you would a Swissroll. The fold in half gently over and over again to incorporate all the fruit evenly.
5. Shape the dough into a ball, dust with flour and cover with plastic film or a plastic bag or place in a large container with a lid. Allow the dough to rest and rise at room temperature for at least 2 hours or until it has doubled in volume.
6. On a lightly floured work surface, knock the dough down and divide into 6-8 equal parts of around 400-500g each. Shape into a rough rectangle.
7. Roll each marzipan ball thinly to size and place to cover all but 1cm around the outer edge of the small rectangle.
8. Roll up again, Swissroll style, and tug in the outside edges. Make sure the marzipan is fully enclosed with dough as to prevent it from boiling out.
9. Stand your Stollens on prepared baking trays spaced out to allow for expanding and rising. Allow to rise a second time at room temperature for a min of 30 minutes to an hour before baking.
10. Bake at 180°C on the thermofan setting of your Lofra for 40 minutes.
11. Soften or melt the last lot of butter and mix with the rum. Brush over the hot baked Stollens.
12. When cold, cover Stollens with whatever you like remembering that they will have to be reheated and brushed at least twice or three times more over the next 2 days. Warm them in the oven at 180°C for 5 minutes each time before brushing so that they can soak up the lovely rumbutter to their little marzipan hearts' content.
13. When the Stollens are cool after the last brushing, sprinkle liberally with icing sugar and wrap in cellophane, tied with, traditionally, a red ribbon. Keep them in a cool place for at least 2 weeks and up to 6 weeks even better.

Recipe, styling and pic: Kanya Hunt
Baked in my gorgeous  Lofra oven available from Electrical Industries

Nb re baking:
Thermofan and not fan assisted


Monday 8 May 2017


Mother's day is upon us. To spoil my mom I will bake her a cake - even though she is far away in Klerksdorp. My husband and I and my mom in law will flatten the cake in two ticks. For us, a Sunday without cake is like a curry without spices. The story of the cake and the recipe will be my mom's gift in the end. She will bake the cake herself and tell me all about it in return. The same cake will be baked for her friends and those happy stories I will also hear. That is why I love my mom so so very much.

I had in my fridge an alarming amount of egg yolks patiently waiting to be put to good use. This, after too many macarons, pavlovas, Swiss meringue butter cream and Italian Meringue was made in The Hunt House Kitchen recently. I remembered reading about a golden cake in my old treasured Betty Crocker recipe book and thought combining this recipe with a custard filling should get rid of a good few lonely yolks.

Of course I tweaked the recipe a bit, as I always do, and I was quite impressed with end result. I am an almond nut - if you are not - use the almond essence very sparingly or simply use vanilla in stead.

The sponge baked perfectly as usual in my Lofra oven
 Use the thermofan setting. Pre-heat the oven to 180 degrees Celcius.


The cake
125g unsalted butter, softened and at room temperature
300g castor sugar
5 jumbo egg yolks (100g)
5ml almond essence (2,5ml possibly also good enough)
300g self raising flour
5ml salt
250ml milk, at room temperature

  1. Cream the butter and sugar together. Add the egg yolks one by one. Whisk well after each addition and continue whisking to dissolve most of the sugar or all if possible. Also add the almond essence.
  2. Sift the flour and salt 4 times.
  3. Fold the dry ingredients alternately with the milk into the egg mixture. Mix lightly until just combined and lump-free.
  4. Divide the mixture between  the two prepared tins.
  5. Bake for 30 minutes. Test and remove to cool completely before removing cakes from the tins.
For the filling
500ml full cream milk
5 jumbo egg yolks (100g)
50g castor sugar
25g corn flour
25g cake flour
A good pinch salt
flavour to taste, in this case a drop or two of almond essence
375ml cream
50ml icing sugar
5ml vanilla
100g ground almonds, roasted lightly

  1. I first bring the milk to boiling point. Use a thick bottomed pot.
  2. Then, in a separate bowl, whisk together the egg yolks, sugar, corn flour, cake flour and salt.
  3. Whisk in the hot milk and return to the stove. Cook the custard on medium heat. Taste and flavour.
  4. Refrigerate to cool or cool in an ice bath. It should be a really thick custard when cold.
  5. Whisk cream till soft peaks, sweeten with icing sugar and flavour to taste. Fold the cream into the cold custard custard.
  6. Cut each layer of cake in half and layer with custard cream and dusted liberally with roasted almond dust.

Recipe and styling: Kanya Hunt
Photography: Jaun Haas Photography


Wednesday 12 April 2017


The Simnel cake is a light fruit cake with marzipan baked in the middle of the cake and used as decoration on top. It often has 11 round balls on top referring to the 11 true Apostles.

The essence of this light fruit festive cake is the quality of the marzipan. Use divine home made marzipan proudly. Make this a day or so in advance, wrap and store refrigerated until required. For the Simnel cake I prefer a simple recipe using some egg yolks to bind the marzipan for colour and keeping it all together seeing as the marzipan is baked into the cake.

Proper marzipan could make this cake very expensive too as a lot of almonds are required. I hate saying this but shop bought Persipan can also be used if you have to.

Marzipan made the old way
Yields about 600g of marzipan
300g finely ground almonds
150g castor sugar
150g icing sugar
2 egg yolks
Start with 5ml almond essence
Extra icing sugar on hand if necessary and to dust surface when rolling
Extra simple syrup or glucose if the paste is too dry
  1. Make sure the almonds are really finely ground. The finer the smoother the marzipan.
  2. In a food processor pulse the ground almonds, castor sugar and icing sugar together. Add the yolks to bind and flavour with almond essence to taste.
  3. Add more icing sugar if necessary to get the marzipan to rolling consistency. This is where I start playing...adding a bit more icing sugar sometimes to have a smoother paste, sometimes adding some glucose too and so on and so on.
  4. Use no less than 300g to shape the first disc to be baked into the Simnel cake.
  5. The rest will be used for the top disc and 11 balls.
  6. When rolling the marzipan, use icing sugar to dust the work surface. 
 The Simnel cake
 Makes one 20cm cake

500g dried fruit cake mix (raisins, sultanas and currants)
125g glacé cherries, washed and quartered
50g mixed cut peel
50ml boiling hot water
50ml good brandy and some...
250g cake flour
7,5ml baking powder
2,5ml salt
5ml mixed spice
5ml ground cinnamon
175g butter, at room temperature
175g castor sugar
4 jumbo eggs
50g ground almonds
Zest of 1 lemon
About 25-30ml freshly squeezed lemon juice

With any fruit cake I like to plump up my fruit mix. I do not always plan well ahead but if you are a planner, do so a week before. If not, the night before will do. It is quite something to get into the festive spirit early on. It starts for me when I start doctoring my fruit. Splash dried fruit mix with water and brandy. Warm in the microwave for a minute, stir well, cover and let it stand overnight. I often can't help sampling the fruit regularly and find the urge to add some more brandy always too strong to resist. Let your urge lead the way...


  1. Prepare a 20cm cake tin by lining the bottom with baking paper. You can also line the sides but I find this unnecessary. The cake will bake longer than normal. Best to protect the sides of the cake tin with a wrap of corrugated card board. I also have a foil lid on stand by just in case. This I use during the latter part of baking if I think the top of the cake is browning a little too much. I must admit, usually for the latter hour of baking as my cake often bakes for 2hrs.
  2. Measure and sift all the dry ingredients 4 times.
  3. Make sure the butter is nice and soft. Soften it more if you have to in the microwave for a few seconds. Using an electric mixer, cream the butter and sugar until light and fluffy using your creaming paddle attachment or as I prefer, the whisk attachment.
  4. Add each whole egg one by one and continue beating to incorporate all of the egg before adding the next. Important, break each egg into a saucer before adding it to your butter mix. I have had many agonizing moments fishing out egg shells due to laziness and "it will not happen to me" moments of false wisdom. Trust me on the saucer...
  5. By the 3rd egg addition your mixture will start splitting. Add the almond flour and continue beating. Then add the last egg. Continue whisking for anther minute or two.
  6. Add the lemon zest and juice and don't worry too much about the mixture splitting at this point.
  7. Fold the sifted dry ingredients into the butter and egg mixture. Don't over mix. An excellent tip is to keep about 25g of the flour mix aside to sprinkle over the fruit. Mix this into the fruit mix very  lightly before folding the fruit into the cake batter.
  8. Have your 1cm thick cut disc of marzipan ready. Spoon half of the cake mixture into the prepared tin. Place the marzipan disc on top and smooth out any air bubbles lightly. Spoon the rest of the cake mixture on top.
  9. Bake on the thermofan setting on your Lofra oven. Pre-heat the oven to 160*C. Baking time is rather long at 1hr 30minutes. Assess if the cake is baked through. Don't be misled by molten marzipan. In this case a skewer inserted in the centre of the cake will not reveal the whole truth and nothing but the truth. You will have to trust your instincts here. If in doubt, return the cake to the oven, cover the top if needed with the foil lid and bake for another 15 minutes. Repeat if necessary.
  10. Allow the cake to cool in the tin before removing it to cool completely on a wire rack. I like to give the cake some cooling down therapy with an extra 50ml of good brandy to soften the outside crust a little. Wrap in cling foil overnight. Perhaps a useful thought: this is a light fruit cake and does not require maturing time but what harm can time do to a fruit cake? I think some curing time with regular splashes of good brandy could but only improve this cake.
To decorate:
  1. Roll 11 marzipan balls. Best way to ensure that they are all more or less the same size is to roll about 125g of marzipan into a thickish sausage. Cut into 11 portions and roll.
  2. Roll all the remaining marzipan on a well dusted surface into a round disc of 20cm in diameter and 1cm thick more or less.
  3. Wet the top of the cake with either simple syrup or warmed smooth apricot jam - just enough for the marzipan disc to stick.
  4. Cover the top with the marzipan disc. Smooth the top and ease the edges in to get a perfect fit. I went one step further and crimped the outside edges to finish the cake off all vintage like. Decorate the top of the cake with the 11 marzipan balls. Dust well with icing.
  5. Brûlée the top and decorate with festive ribbons and other Easter or bunny like paraphernalia if you have. 
 
Copy, styling and pics: Kanya Hunt

Tuesday 14 February 2017


LAVENDER SHORTBREAD HEARTS FOR MY VALENTINE

Makes 36 medium sized hearts or fluted rounds of 7cm diameter
a 24cm diameter single tart cut into 16 slices

I simply adore shortbread. It is all about the butter and that lasting buttery memory. Apart from that I think it is probably one of the most versatile pastries for biscuit making there is and it is suitable to any occasion or feast from Christmas (which seems like yesterday!) right through to Valentine’s day. Stick to the traditional plain round disc, or play with flavours such as lavender, coffee, chocolate, rosemary, caramel and more and more.

Making the pastry is similar as to making any other pastry. I often use my food processor instead of my mixer. The butter and sugar mix will cream better in a mixer though I think.

Characteristically shortbread should always be pale to a very light golden  colour hence the slightly lower baking temperature.

My new Lofra oven baked them perfectly!

You will need:
250g butter, unsalted
125g castor sugar
250g cake flour
125g corn flour
1ml salt
Flavour variations
·      6 lavender flower heads, chopped
·      10g - 20g (30ml-60ml) coffee beans, freshly ground, depending on taste and strength of the bean
·      5ml vanilla essence
·      100g any nut, chopped, my favorites: pecan, pistachio, hazel, macadamia
·      Chopped fragrant rose petals, a few drops of rose extract and Pistachio should make a wonderful biscuit
·      Citrus zest to taste
 
Depending on the look: extra castor sugar to dredge or chocolate to dip

 Method:
1. Pre-heat the oven on only when biscuits are chilling to 160°C.
2. Cream the butter on its own first till very light. Add the castor sugar slowly and continue beating until mixture is light and fluffy.
3. Sift together the flour, corn flour and salt. I do this 3-4 times to ensure that all are mixed in proper.
4. Add your flavour component to the butter mix first and mix well. Then add the dry ingredients. Rub or cut the pastry to form a soft dough that lightly can be pressed together in a loose-bottomed tart pan or in a ball if you are to be making shortbread thins or biscuits.
5. If making a whole round, simply press down, smooth and prick with a fork or some other funky sharp object - a toothpick could be that. Pre-cut the wedges. Bake for 45-60 minutes till crisp but still pale in colour. Cool, re-cut and dredge with castor sugar.
6. For biscuits or thins, flatten the dough and wrap in plastic film. Allow the dough to rest for at least 30 minutes to an hour. Lightly dust a cold surface, granite is super, and roll to a thickness of 5mm. Cut in shapes. Carefully transfer to a lined baking sheet and chill for 30 minutes before baking at 160 for 15-20 minutes. Remove and cool a bit before transferring to a cooling rack to cool completely. Decorate, dredge, or dip with pleasure.

Photography and styling: Heléne Venter 
Copy and styling: Kanya Hunt
Kanya Hunt © 2013